


Quicker movement of your storage units means your budget will go even further allowing you flexibility, efficiency and creativity in your store designs.
• Using the especially designed Atlas Lever Bar™.
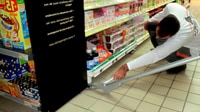
• Position the Atlas Lever Bar’s heel end.
• Insert the shelving unit’s outer leg into the engineered notch of the Atlas Lever Bar™.
• Simply lift the unit leg by just 3cm (1.18 inches).
• Slide the Atlas skate under the leg by positioning it carefully into the circular slot engineered for the Atlas skates™.
Slowly release the leg down. Atlas™ is fitted.
• Repeat this procedure until all the unit’s outer legs are fitted with Atlas™.
If the unit is loaded with unstable merchandise (such as liquids) you are advised to remove 30% of the stock.
ATLAS™ skates has the capability to turn through 360° and can be manoeuvred into any position.
Once all your skates are fitted, one person situated at the unit end and two or three others to guide the manoeuvre are needed to move the shelving to the designated area.
When the shelving is in the required place, lift the feet with the Atlas Lever Bar™ to remove one skate at a time.
1 case of 12 ATLAS™ will move a 5 bay gondola (double sided).
2 cases of 12 ATLAS™ will move an 11 bay gondola (double sided).
3 cases of 12 ATLAS™ will move a 17 bay gondola (double sided).

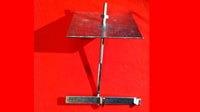

Atlas Holding Bar™ Instructions
For maximum security when carrying out specific manoeuvres
(i.e.: uneven floor, pierced backs for hook displays, wall gondolas…),
we advise the use of Atlas Holding Bar™ : a safety fixture that locks gondola units together when moving.
(Included in cases of 12 Atlas skates)
1- Insert the Locking Bar (A) through the hole in the middle of the plate (B), making sure the hook is towards the bottom and Wing Nut (D) towards the top (see fig.1).
2- Lay the plate (B) flat; at the top of the gondola’s pole.
3- Insert the Sliding Bar (C) into the first four slots on top of the pole. Make sure the Sliding Bar (C) goes through the eye of the hook (A) and out through the opposite side.
4- Tighten the Wing Nut (D) on the Locking Bar (A) to secure the plate to the top of the pole.
Always fix the Holding Bars BEFORE positioning any ATLAS skates™.
Always remove the Holding Bars AFTER removing all ATLAS skates™.


Maintenance advice
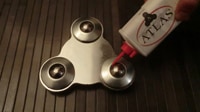
We recommend you clean your ATLAS™ skate after each use by simply wiping the ball bearings using a dry cloth and a few drops of lubrication oil. ATLAS™ skates and equipment should always be stored in their provided cases in an area free from moisture & cold.